Fugu Jailbreak
Fugu Jailbreak is an open source untethered jailbreak.
In other words, it means that anyone can contribute to the development of Fugu jailbreak.
The Jailbreak was developed using checkm8 exploit and Fugu jailbreak was developed by security researcher Linus Henze from Koblenz, Germany.
Fugu jailbreak with latest iPhone Models
Fugu Jailbreak with old iPhone Models
iPhone X, iPhone 8, iPhone 7, iPhone 6
Fugu Jailbreak for iPhone 14
Even if the Fugu Jailbreak is supported on the latest iPhone models, still there is no hint about compatibility with the iPhone 14. But don’t worry, we have listed the best alternatives for iPhone 14 Jailbreak. Which will take you to new dimensions in the Jailbreaking era.
Palera1n Virtual Terminal Jailbreak
Fugu Jailbreak for iPhone 13
Fugu Jailbreak has been tested on iPhone 13 and without any issues.
You can try Fugu jailbreak
Fugu Jailbreak for iPhone 12
Fugu 15 Max, Fugu 15 and Fugu 14 are compatible with iPhone 12 Series. Some device models are compatible with only Fugu 15
Fugu 15 compatible iPhone 12 device Models
iPhone 12, iPhone 12 Pro Max
Following iPhone 12 Models are compatible with the Fugu 14 Jailbreak You don’t need to worry about the jailbreaking process.
Fugu 14 Compatible iPhone 12 device Models
iPhone 12 mini, iPhone 12, iPhone 12 Pro, iPhone 12 Pro Max
Fugu Jailbreak for iPhone 11
iPhone 11 is also compatible with Fugu15 and Fugu 14 Jailbreak. Follow the guidelines and do the jailbreak with Fugu.
Compatible iPhone 11 series
iPhone 11, iPhone 11 Pro, iPhone 11 Pro Max
Fugu 15
Fugu 15 is a developer focused jailbreak. Fugu 15 semi-untethered jailbreak runs with the Sileo package manager.
Now you can download Fugu 15 using the below button.
Compatible iOS versions
iOS 15, iOS 15.0.1, iOS 15.0.2, iOS 15.1, iOS 15.1.1, iOS 15.2, iOS 15.2.1, iOS 15.3, iOS 15.3.1, iOS 15.4, iOS 15.4.1
Install Fugu15 with the help of Safari
To complete the Fugu 15 Jailbreak installation, you must own a website with a domain on your own.
Step 01 – You need to ensure that both your iPhone and Computer are connected to the same network.
Step 02- Make sure to modify the DNS a record match with your computer’s local IP address
Step 03 – Get a certificate for your domain (say, using Let’s Encrypt) and copy it to the files Server/serverCert/fullchain.cer and Server/serverCert/server.key (private key)
Step 04 – install Flask (pip3 install Flask)
Step 05 – Set your domain’s server Url in Server/server.py.
Step 06 – Open the Server directory, and run python3 server.py.
Step 07 – Take your iPhone, go to your domain, and follow the directions.
Install Fugu 15 with TrollStore
Step 01 – Install TrollStore on iOS 15.4.1 or later version
Step 02 – Save Fugu 15. tips on iCloud after downloading Fugu 15
Step 03 – Using TrollStore app you can share the downloaded IPA file
Step 04 – Fugu will be installed quickly after the TrollStore is loaded.
Step 05 – Go to Home Screen, open the Fugu15 application.
Fugu 15 Max
Fugu 15 Max is a semi – untethered jailbreak tool for iOS iOS 15 to 15.4.1 versions. Fugu Max supports Sileo and Zebra package managers.
Compatible iPhones
iPhone 13, iPhone 13 Mini, iPhone 13 Pro, iPhone 13 Pro Max, iPhone 12, iPhone 12 Mini, iPhone 12 Pro, iPhone 12 Pro Max, iPhone 11, iPhone 11 Pro, iPhone 11 Pro Max, iPhone XS, iPhone XS Max, iPhone XR, iPhone SE (1st / 2nd gen)
Supported iOS versions
iOS 15.4.1, iOS 15.4, iOS 15.3.1, iOS 15.3, iOS 15.2.1, iOS 15.2, iOS 15.1.1, iOS 15.1, iOS 15.0.2, iOS 15.0.1, iOS 15
Fugu15 Max Jailbreak IPA file can be installed using TrollStore. However, Fugu15 Max can not be recommended to the public as it is a beta version yet. There should be support for user space reboot, a user interface and support for A14 chip – equipped devices to introduce it to the public.
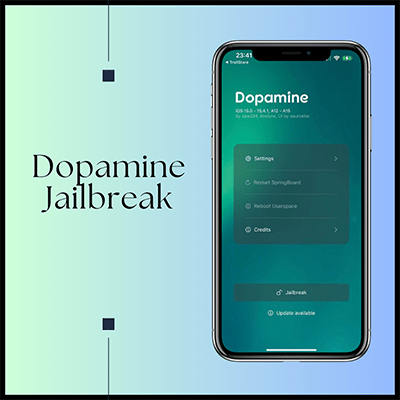
Dopamine Jailbreak
Dopamine Jailbreak is a semi – untethered perma signed jailbreak solution. It is the latest continuation of Fugu15 Jailbreak. Fugu15 Max developer has named the jailbreak as Dopamine Jailbreak and came up with a new UI.
Compatible iOS devices
iPhone 13, iPhone 13 Mini, iPhone 13 Pro, iPhone 13 Pro Max, iPhone 12, iPhone 12 Mini, iPhone 12 Pro, iPhone 12 Pro Max, iPhone 11, iPhone 11 Pro, iPhone 11 Pro Max, iPhone XS, iPhone XS Max, iPhone XR, iPhone SE (1st / 2nd gen)
Supported iOS versions
iOS 15.4.1, iOS 15.4, iOS 15.3.1, iOS 15.3, iOS 15.2.1, iOS 15.2, iOS 15.1.1, iOS 15.1, iOS 15.0.2, iOS 15.0.1, iOS 15
Sileo, Zebra are the supporting package managers for Dopamine Jailbreak
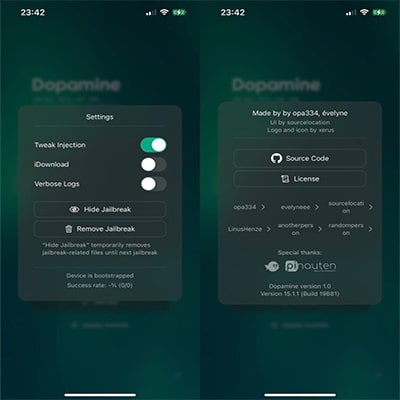
Features of Dopamine Jailbreak
- It is capable of doing tweak injection via ElleKit
- Automatic trust cache handling
If you are looking for new updates on Fugu15 Max Jailbreak, you have to download the Dopamine Jailbreak.
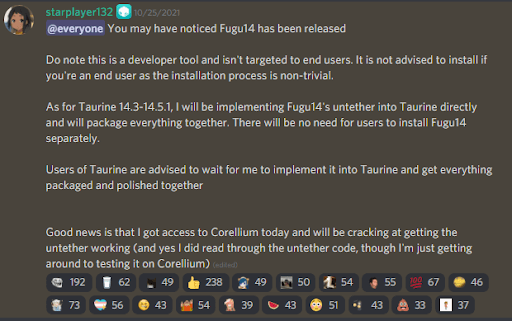
Following are some images from the Dopamine Jailbreak
How to setup Dopamine Jailbreak on your iOS device
1. Install TrollStore on your device according to the iOS version
2. Click the above Dopamine Jailbreak IPA button to download the Dopamine Jailbreak
3. Save the downloaded Dopamine file in iCloud
4. Then, share the downloaded IPA file with TrollStore
5. TrollStore will install Dopamine Jailbreak IPA
6. Now you can see the Dopamine Jailbreak on your home screen
Fugu 14
Fugu 14 is an untethered jailbreak supported for iOS 14 – iOS 14.5.1 Fugu14 is also combined with Unc0ver Jailbreak as well.
Do you need to try Fugu 14?
Try download it from below button.
Compatible iOS versions
iOS 14.5.1, iOS 14.5, iOS 14.4.2, iOS 14.4.1, iOS 14.4, iOS 14.3
Fugu14 jailbreak is still on the developer stage. It means even if Fugu 14 is released to the public, you have to put extra effort to setup the Fugu 14 with some tools.
Prerequisites
XCode
Python
Homebrew
iOS Firmware
AltStore
How to setup Fugu 14 on your iPhone
Step 01 – You have to unzip the downloaded Fugu 14 archive file
Step 02 – Open the unzipped file > Go to arm > iOS > Fugu14App > Fugu14App.xcodeproj.
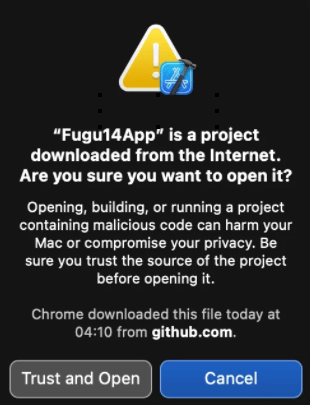
Step 03 – Tap on the “trust and open” from the prompt message. Now open the xcode project.
Step 04 – While performing the task connect your iPhone to the computer. Go to Fugu 14 app, then Targets > Signing & Capabilities > Team. If there is no Apple ID, tap on add an account then follow on-screen instructions.
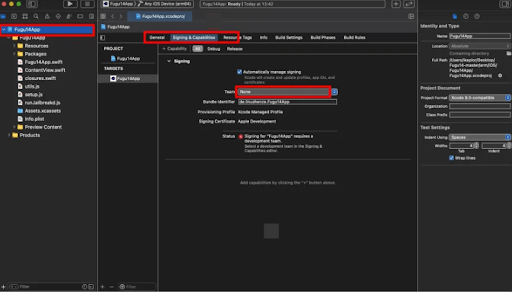
Step 05 – If you get an error message, tap bundle Identifier and add some random text. Quickly it will fix the error.
Step 06 – Close the Xcode window. Again go to the Fugu14-master folder. Find the ‘ios_install.py’ and run it. Type cd and drag the Fugu 14 master folder into the terminal window to update the file path.
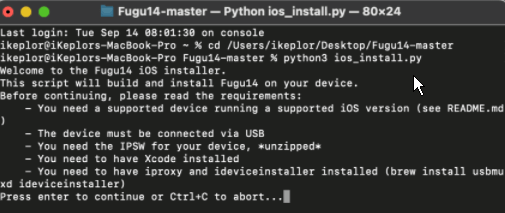
Step 07 – Tap Enter. It will get a ‘Welcome to the Fugu14 iOS installer’ message on the terminal window.
Step 08 – Check whether you have the requirements listed in the terminal window. Especially if you have an iproxy and iDevice installer, tap enter to continue.
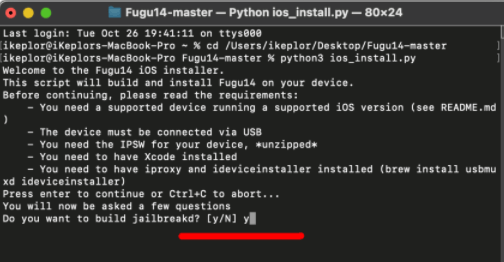
Step 09 – the process will go with asking some questions from you. In the end . Tap Y for “Do you want to build a jailbreak?”
Step 10 – Then it will ask “ What is the name of your iOS signing certificate?” Open altstore and go to your iPhone Settings > General > Device Management. Go to Apple ID, tap on it, you will see the iOS signing certificate name, type it on the terminal.
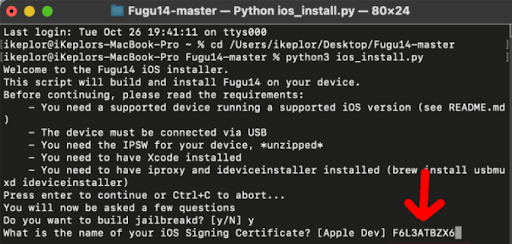
Step 11 – At the moment, it will be compiling the jailbreak & wait for the message stating “BUILD SUCCEEDED”
Step 12 – Rename the downloaded ipsw file extension to .zip. Then extract it. Find the largest dmg file from the extracted folder. Just double click to mount the file.
Step 13 – Again go to the terminal window. Type the part of the dmg file. You might get a “mount path not valid” error. If so, remove the slashes, then tap enter. It will show the created IPA.
Step 14 – Make sure the iPhone is connected to Mac. Now tap enter to continue and Fugu 14 will start the sideloading process to your iPhone. Fugu14 will show an untrusted developer message. Go to Settings > General > Device Management. You can see Apple development there, tap to trust the app. Fugu14 will open.
Step 15 – Tap on the ‘Setup Fugu14’. Once completed the process through the iPhone, go to the terminal window again. Tap enter. It will display ‘Open the Fugu14App again following the on-screen instructions! message.
Step 16 – Reopen Fugu14 n from the iPhone. Go ahead according to the on-screen instructions.
Step 17 – Again go to the Terminal Window. Run the following commands via new terminal windows.
iproxy 1337 1337
Nc localhost 1337

Major Facts about Fugu14
- Not supported with online jailbreak
- Fugu does not support iOS 14.6 and later versions. Go with alternatives
- Computer based jailbreak (Mac supported)
- Kernel exploit is extremely reliable for this jailbreak
- Fugu jailbreak is in developer stage
- Not supported for iPhone X and older iPhones You need to use alternatives.
We have listed more information about iPhone Jailbreak
Please visit the above link, if you need more information regarding jailbreak with iPhones.
Unc0ver Jailbreak
Uncover v7.0.0 now supports i0S 14.4 to iOS 14.5.1 and with unc0ver jailbreak you can jailbreak your iPhone without any difficulty.
It was developed by Pwn20wnd
How to install the Fugu14 untether with the Unc0ver jailbreak
You have to set up Fugu manually with unc0ver v7.0.0
But now most of the bugs are fixed via Unc0ver v7.0.1, v7.0.2. and you can install Fugu 14 automatically with unc0ver jailbreak app side-loading via the AltStore v1.4.8.
When you install the Unc0ver via AltStore, a message will pop up saying “ jailbreak requires untethering” to make it untether. However, you have the option, install without untethering as you wish.

Taurine Jailbreak
Taurine is a semi-untethered jailbreak tool for iOS 14 – iOS 14.3 by CoolStar.
Find more information about Taurine
iPhone X, iPhone 8, iPhone 7, iPhone 6
Fugu Jailbreak does not support the above iPhone Models.
Don’t worry, There are solutions. Users who are using older iPhone models can go to alternative solutions provided below. Following alternatives are the best in the market nowadays, that you can experience the extra features on your iPhone like new tweaks, themes, wallpapers and much more things are available you to install via following jailbreak solutions.
Palera1n Virtual Terminal Jailbreak
Fugu Jailbreak Alternatives

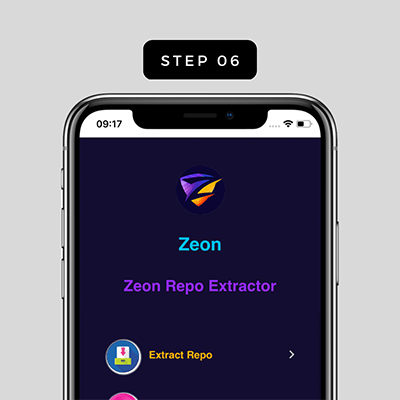
Zeon Repo Extractor
Zeon jailbreak repo extractor is the best solution for iOS 14 to iOS 16.4 users. You can install Jailbreak features/ apps on your latest iPhone 14 too. Installing Zeon on your iPhone is an online process which takes a few seconds.

Compatible iOS versions
iOS 26 beta, iOS 18.6 beta, iOS 18.5, iOS 18.4.1, iOS 18.4, iOS 18.3.2, iOS 18.3.1, iOS 18.3, iOS 18.2.1, iOS 18.2 , iOS 18.1.1, iOS 18.1 , iOS 18.0.1, iOS 18 , iOS 17.7.2, iOS 17.7.1, iOS 17.7 , iOS 17.6.1, iOS 17.6, íOS 17.5.1, iOS 17.5, iOS 17.4.1, iOS 17.4, iOS 17.3.1, iOS 17.3, iOS 17.2.1, iOS 17.2, iOS 17.1.2, iOS 17.1.1, iOS 17.1, iOS 17.0.3, iOS 17.0.2, iOS 17.0.1, iOS 17, iOS 16.7.8, iOS 16.7.7, iOS 16.7.6, iOS 16.7.5, iOS 16.7.4, iOS 16.7.3 iOS 16.7.2, iOS 16.7.1, iOS 16.6.1, iOS 16.6, iOS 16.5, iOS 16.4.1, iOS 16.4, iOS 16.3.1, iOS 16.3, iOS 16.2, iOS 16.1.2, iOS 16.1.1, iOS 16.1, iOS 16.0.3, iOS 16.0.2, iOS 16.0.1, iOS 16, iOS 15.8.2, iOS 15.8.1, iOS 15.7.9, iOS 15.7.8, iOS 15.7.7, iOS 15.7.6, iOS 15.7.5, iOS 15.7.4, iOS 15.7.3, iOS 15.7.2, iOS 15.7.1, iOS 15.7, iOS 15.6.1, iOS 15.6, iOS 15.5, iOS 15.4.1, iOS 15.4, iOS 15.3.1, iOS 15.3, iOS 15.2.1, iOS 15.2, iOS 15.1.1, iOS 15.1, iOS 15.0.2, iOS 15.0.1, iOS 15, iOS 14.8.1, iOS 14.8, iOS 14.7.1, iOS 14.7, iOS 14.6, iOS 14.5.1, iOS 14.5, iOS 14.4.2, iOS 14.4.1, iOS 14.4, iOS 14.3, iOS 14.2.1, iOS 14.2, iOS 14.1, iOS 14.0.1, iOS 14
Compatible iPhone Models
Including iPhone 16 all the devices (iPhones) are compatible with Zeon Repo Extractor
Zeon Repo Extractor installation Guide
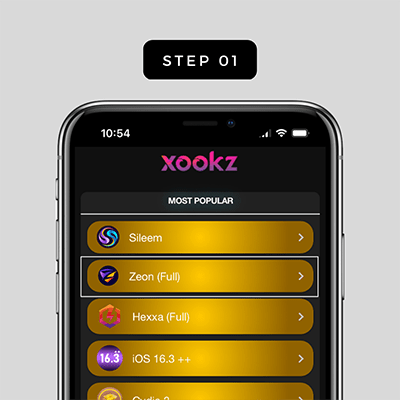
Step 01 – Open Xookz App Store, then tap on Zeon (Full)
Step 02 – Tap the Install the Button on the right upper corner, you’ll get a popup -> Tap on Allow button to get the Configuration Profile in to your iPhone.
Step 03 – Go to Settings, then select downloaded profile -> Tap on install button on the right upper corner

Step 04 – Provide your Home screen passcode and tap on install button.
Step 05 – It’s time to experience the Zeon Repo Extractor.
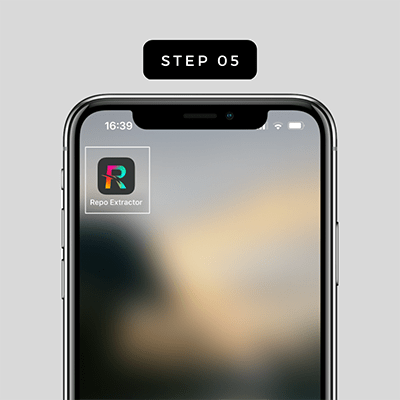
Step 06 – Open the Zeon Repo Extractor -> Tap on Get Repos select the repo you want to extract.
Step 07 – Copy the URL -> Go back and Select the Extract a repo, paste it in the space provided.
Step 08 – Extract the URL by tapping OK button.

Palera1n Jailbreak
Palera1n is Checkm8 jailbreak for iOS 15 – iOS 15.7.4 & iOS 16 – iOS 16.4. It is a semi-tethered jailbreak still under development. For a smooth jailbreak installation process you need help from the following tools.
Linux or macOS, Python 3
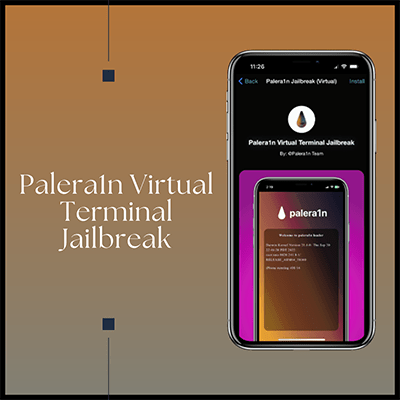
Palera1n Virtual Terminal Jailbreak
This is a semi tethered jailbreak solution newly released for iPhone 14 jailbreak.
After the jailbreaking process is completed Sileo will be installed automatically.
You can experience amazing themes, tweaks, wallpapers and much more features with Palera1n Virtual Terminal Jailbreak.
Compatible iOS versions
iOS 26, iOS 18.6 beta, iOS 18.5, iOS 18.4.1, iOS 18.4, iOS 18.3.2, iOS 18.3.1, iOS 18.3 , iOS 18.2.1, iOS 18.2 , iOS 18.1.1, iOS 18.1 , iOS 18.0.1, iOS 18 , iOS 17.7.1, OS 17.7 , iOS 17.6.1, iOS 17.6, iOS 17.5.1, iOS 17.5, iOS 17.4.1, iOS 17.4, iOS 17.3.1, iOS 17.3, iOS 17.2.1, iOS 17.2, iOS 17.1.2, iOS 17.1.1, iOS 17.1, iOS 17.0.3, iOS 17.0.2, iOS 17.0.1, iOS 17, iOS 16.7.8, iOS 16.7.7, iOS 16.7.6, iOS 16.7.5, iOS 16.7.4, iOS 16.7.3, iOS 16.7.2, iOS 16.7.1, iOS 16.6.1, iOS 16.6, iOS 16.5, iOS 16.4.1, iOS 16.4, iOS 16.3.1, iOS 16.3, iOS 16.2, iOS 16.1.2, iOS 16.1.1, iOS 16.1, iOS 16.0.3, iOS 16.0.2, iOS 16.0.1, iOS 16
Features of Palera1n Virtual Terminal Jailbreak
- No harm for your battery and your warranty
- Gives you Sileo package manager
Using Xookz app store, you will be able to download Palera1n Virtual Terminal Jailbreak. All you need to do is follow the installation guidelines.
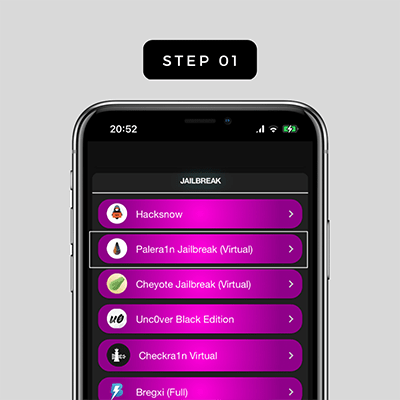
Palera1n Virtual Terminal Jailbreak Installation Guide
Step 01- Open the Xooks App store on your iPhone and slide down to Jailbreak category and tap on Palera1n virtual Terminal Jailbreak.
Step 02 – Tap on Install button on the right upper corner, allow when the popup message appears on the screen
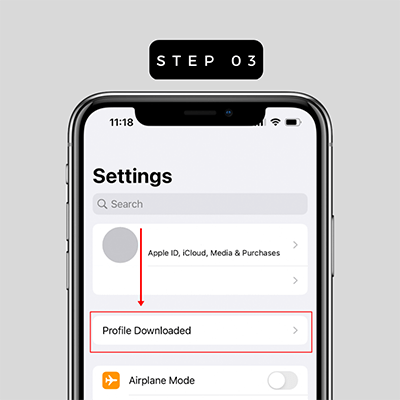
Step 03 – Go to Settings and tap on Profile Downloaded
Step 04 – First, you have to install Terminal on your iPhone by giving the home screen passcode.
Step 05 – Once you install the Terminal on you iPhone, you’ll see another icon named with Palera1n iPSW
Step 06 – Tap on Palera1n iPSW and copy the code relevant to your iPhone model
Step 07 – Then paste that code in the Terminal and tap on Done button
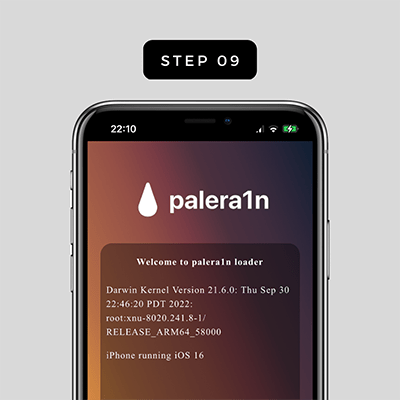
Step 08 – After few seconds, the following message will be displayed on the screen
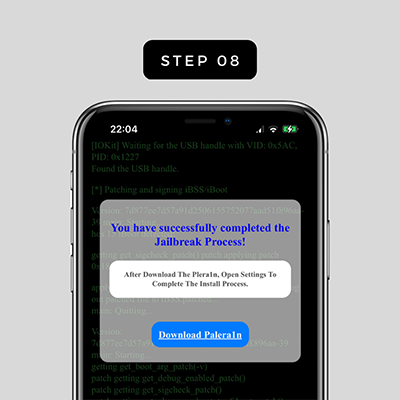
Step 09 – Now you have successfully installed the Palera1n Virtual jailbreak on your iPhone
Checkra1n Jailbreak
Fugu jailbreak does not work with iPhone X and older devices. Checkra1n Jailbreak is the best alternative solution for iOS 14 to iOS 14.8.1
Compatible iOS Versions
iOS 14.8.1, iOS 14.8, iOS 14.7.1, iOS 14.7, iOS 14.6, iOS 14.5.1, iOS 14.5, iOS 14.4.2, iOS 14.4.1, iOS 14.4, iOS 14.3, iOS 14.2.1, iOS 14.2, iOS 14.1, iOS 14.0.1, iOS 14
Compatible iPhone Devices
iPhone 6, iPhone 6 Plus, iPhone 6S, iPhone 6S Plus, iPhone 7, iPhone 7 Plus, iPhone 8, iPhone 8 Plus, iPhone X
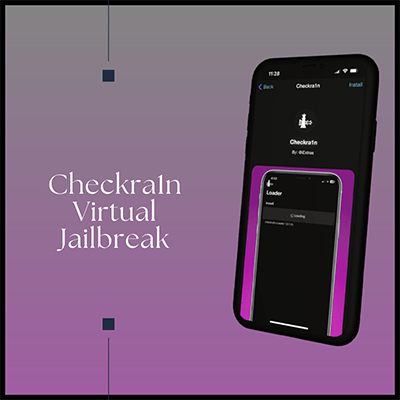
Checkra1n Virtual Jailbreak
Checkra1n Virtual Jailbreak is the best alternative solution for latest iOS versions.
Are you looking for iOS 16 Jailbreak with Checkra1n Jailbreak? Click here
If you are using higher versions than iOS 14, this is the right time to try the Checkra1n Virtual Jailbreak on your iPhone. With the Cydia package manager you can install jailbreak apps, themes and much more things.
Compatible iOS versions
iOS 26, iOS 18.6 beta, iOS 18.5, iOS 18.4.1, iOS 18.4, iOS 18.3.2, iOS 18.3.1, iOS 18.3 , iOS 18.2.1, iOS 18.2 , iOS 18.1.1, iOS 18.1 iOS 18.0.1, OS 18 , iOS 17.7.1, iOS 17.7 , iOS 17.6.1, iOS 17.6, iOS 17.5.1, iOS 17.5, iOS 17.4.1, iOS 17.4, iOS 17.3.1, iOS 17.3, iOS 17.2.1, iOS 17.2, iOS 17.1.2, iOS 17.1.1, iOS 17.1, iOS 17.0.3, iOS 17.0.2, iOS 17.0.1, iOS 17, iOS 16.7.8, iOS 16.7.7, iOS 16.7.6, iOS 16.7.5, iOS 16.7.4, iOS 16.7.3, iOS 16.7.2, iOS 16.7.1, iOS 16.6.1, iOS 16.6, iOS 16.5, iOS 16.4.1, iOS 16.4, iOS 16.3.1, iOS 16.3, iOS 16.2, iOS 16.1.2, iOS 16.1.1, iOS 16.1, iOS 16.0.3, iOS 16.0.2, iOS 16.0.1, iOS 16, iOS 15.8.2, iOS 15.8.1, iOS 15.7.9, iOS 15.7.8, iOS 15.7.7, iOS 15.7.6, iOS 15.7.5, iOS 15.7.4, iOS 15.7.3, iOS 15.7.2, iOS 15.7.1, iOS 15.7, iOS 15.6.1, iOS 15.6, iOS 15.5, iOS 15.4.1, iOS 15.4, iOS 15.3.1, iOS 15.3, iOS 15.2.1, iOS 15.2, iOS 15.1.1, iOS 15.1, iOS 15.0.2, iOS 15.0.1, iOS 15
Compatible Devices
iPhone 16, iPhone 16 plus, iPhone 16 pro, iPhone 16 pro max, iPhone 15, iPhone 15 plus, iPhone 15 pro, iPhone 15 pro max, Phone 14, iPhone 14 Plus, iPhone 14 Pro, iPhone 14 Pro max, iPhone 13, iPhone 13 Pro, iPhone 13 Pro, iPhone 13 Mini, iPhone 12 Mini, iPhone 12, iPhone 12 Pro, iPhone 12 Pro Max, iPhone 11, iPhone 11 Pro, iPhone 11 pro max, iPhone XS, iPhone XS Max, iPhone XR, iPhone X, iPhone 8, iPhone 8 Plus, iPhone 7, iPhone 7 Plus, iPhone 6s, iPhone 6s Plus, iPhone 6, iPhone 6 Plus, iPhone SE
Checkra1n Virtual Installation Guide
Step 01 – Open Xookz app on your iPhone. Then tap on Checkra1n Virtual in the Jailbreak category.
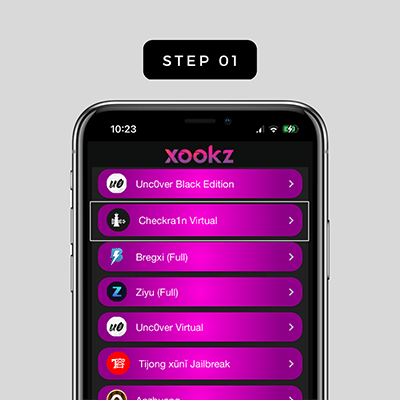
Step 02 – Tap on install button on the right upper corner. It will pop up a message to Allow Profile download into your iPhone
Step 03 – Allow the button -> Go to Settings and Tap on Profile Downloaded.

Step 04 – Again tap on install button and give your home screen passcode to install the jailbreak
Step 05 – It’s time to work with Uncover Virtual Jailbreak
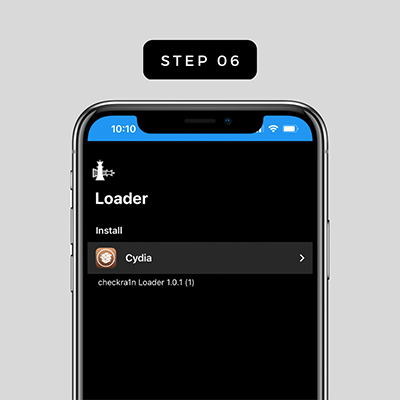
Step 06 – Open the jailbreak app and install Cydia using Checkra1n Virtual
You may also like to read with,
iOS 17 .0 – iOS 17.0.3 Jailbreak
iOS 17.1 – iOS 17.1.2 Jailbreak
iOS 17.2 – iOS 17.2.1 Jailbreak
iOS 17.3 – iOS 17.3.1 Jailbreak
iOS 17.4 – iOS 17.4.1 Jailbreak
iOS 17.6 – iOS 17.6.1 Jailbreak
If you are interested in jailbreaking following devices, tap on below links